If you’ve been admiring those gorgeous quilts on Pinterest or Instagram and thinking, “I want to make one of those,” you’re in the right place. But when you start researching what you need to begin quilting, the sheer volume of tools, gadgets, and supplies can feel overwhelming. Walk into any quilt shop and you’ll find hundreds of specialized rulers, cutting tools, fancy gadgets, and accessories that promise to make your quilting life easier.
Here’s the truth: You don’t need most of that stuff to make your first quilt. In fact, starting with too many tools can actually make the learning process more confusing and expensive.
In this comprehensive guide, we’ll walk through exactly which quilting tools beginners really need, which ones are helpful but not essential, and which you can save for later. We’ll also explore the surprising health benefits of quilting that go far beyond creating beautiful handmade quilts.
By the end of this article, you’ll have a clear, practical checklist that will get you started on your quilting journey without breaking the bank or cluttering your craft space with unnecessary items.
Why Take Up Quilting? The Science-Backed Health Benefits
Before we dive into the tools, let’s talk about why quilting is worth the investment of time and money. Recent scientific research has uncovered remarkable health benefits associated with this traditional craft.
A landmark study published in the Journal of Public Health (Oxford Academic) examined quilters and found significant cognitive, emotional, and social benefits. Participants experienced improved wellbeing through quilting’s demand for concentration, skill development, and the experience of “flow” – that absorbed state where time seems to disappear.
The research identified several key therapeutic elements:
Mental Health Benefits: Research shows that quilting can reduce stress and anxiety, improve mood and self-esteem, provide mindfulness and presence in the moment, offer creative expression for complex emotions, and combat depression through the sense of accomplishment.
According to research published in SAGE Journals, engagement in craft activities like quilting is associated with a significantly lower risk of mild cognitive impairment in later life. One Mayo Clinic study found that people with crafting hobbies such as sewing and quilting were 45% less likely to suffer from mild cognitive impairment compared to those without such hobbies.
Cognitive Protection: The planning, visuospatial reasoning, and manual dexterity involved in quilting engage multiple cognitive domains. Research suggests that physical and mental stimulation through hobbies may increase growth factors that help brain cells function better and prevent them from dying off. This makes quilting a powerful tool for maintaining cognitive health as we age.
Stress Reduction and Flow: The repetitive nature of quilting can induce a state of “flow” – complete immersion where focus is absorbed in the present. This meditative state is associated with reduced stress levels, increased feelings of wellbeing, and enhanced creativity. In fact, when researchers measured stress indicators across various activities (playing cards, video games, painting, sewing, and reading), sewing appeared to be the most relaxing of all.
Physical Health Benefits: Studies have demonstrated that needlecrafts can lower heart rate and blood pressure due to their calming effect on the body. Additionally, quilting helps maintain hand-eye coordination and fine motor skills, which naturally decline with age and can lead to increased clumsiness and higher fall risk.
Social Connection: Quilting frequently happens in groups, guilds, or charity projects, offering social support, belonging, and shared purpose – all protective factors for mental health. Research published in JAMA Network emphasizes that social connections have an independent influence on mortality, heart attack survival, cognitive decline, depression, and anxiety.
Chemical Benefits: While engaged in quilting, your brain is saturated with dopamine and serotonin, known as “the happy chemicals.” This reaction is especially powerful when you’re creating something using your hands. These neurotransmitters act as natural antidepressants, improving mood and overall wellbeing.
In short: quilting isn’t just a hobby – it’s an investment in your mental, cognitive, and physical health. Now let’s get you set up with the right tools to begin this rewarding journey.
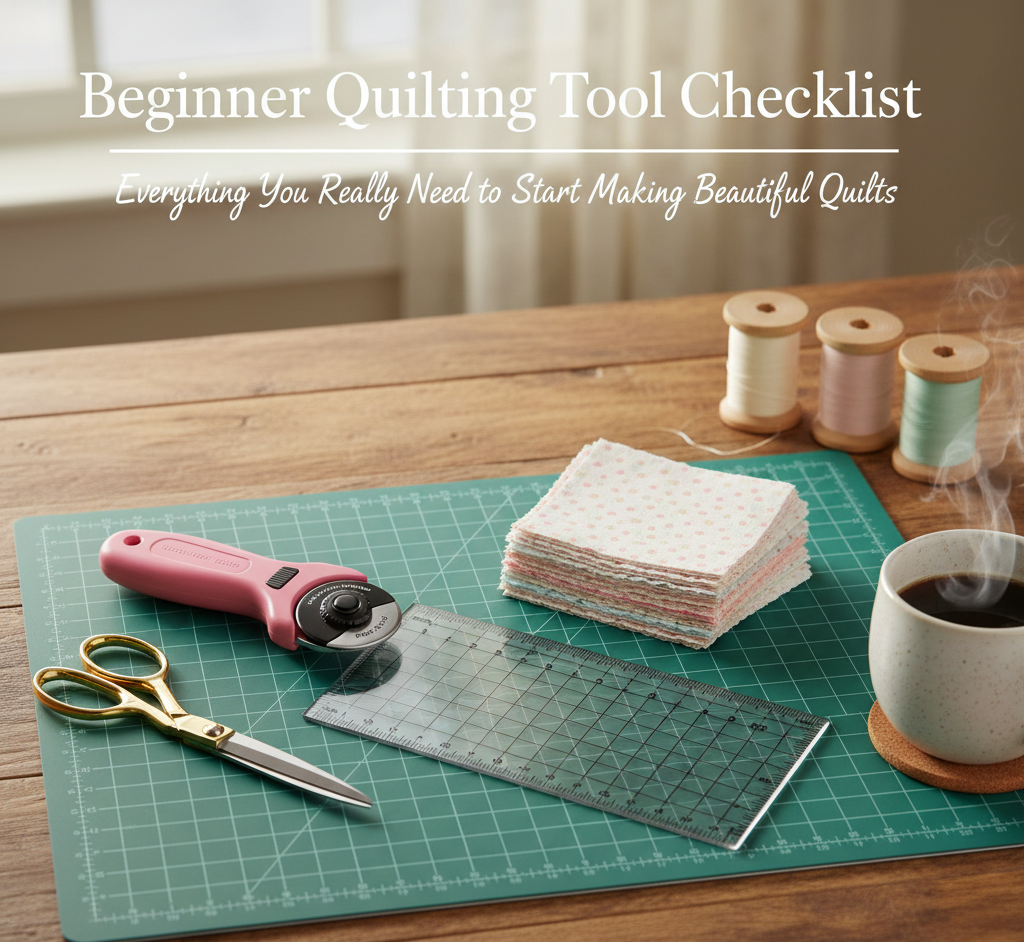
The Essential Tools: What You Absolutely Need
These are the non-negotiable tools you’ll need to make a quilt. Without these items, the process becomes extremely difficult or even impossible.
1. Rotary Cutter
A rotary cutter looks like a pizza cutter with an extremely sharp circular blade. This tool revolutionized quilting by making it possible to cut fabric quickly, accurately, and through multiple layers at once.
Why it’s essential: Traditional scissors simply can’t match the precision and speed of a rotary cutter. Accurate cutting is the foundation of successful quilting – if your pieces aren’t cut precisely, they won’t fit together properly, leading to frustration and wonky blocks.
What to buy: For beginners, a 45mm rotary cutter is the perfect starting size. It’s large enough to cut through 2-3 layers of fabric efficiently but not so large that it’s unwieldy. The 45mm size is the most versatile and what most quilters use for the majority of their projects.
Recommended brands: OLFA is the gold standard – their cutters are durable, the safety lock works well, and the screw doesn’t loosen over time like some cheaper brands. Fiskars and Martelli also make excellent rotary cutters.
Important safety note: Rotary cutter blades are razor-sharp. Always engage the safety lock when not actively cutting, never leave it open on your workspace, and keep it away from children and pets.
2. Self-Healing Cutting Mat
A self-healing cutting mat is a specially designed surface that works in tandem with your rotary cutter. The multi-layered construction allows the blade to glide through fabric while “self-repairing” to avoid deep grooves.
Why it’s essential: Without a cutting mat, you’ll ruin your work surface and dull your rotary cutter blade almost immediately. The mat protects your tables and extends the life of your blade. Plus, most mats have printed grid lines that serve as measuring guides, making cutting more accurate.
What to buy: If you have space, a 24″ x 36″ mat is the ideal size for most quilting projects. This size fits on most tables and gives you plenty of room to work. If space is limited, an 18″ x 24″ mat will work, though you may need to reposition fabric more often.
Important storage tip: Cutting mats must be stored flat – never rolled, never leaned against a wall. Heat and warping will ruin them. Store under a bed, behind furniture, or flat on a shelf.
Recommended brands: OLFA, Fiskars, and Omnigrid all make excellent self-healing mats. Look for clear grid markings and a surface with good grip.
3. Quilting Rulers
Quilting rulers are transparent acrylic rulers with specialized markings including angles, grids, and seam allowances. They’re designed to work with rotary cutters and cutting mats to create perfectly accurate cuts.
Why they’re essential: Regular rulers don’t have the grip to stay in place while you’re cutting with a rotary cutter, and they lack the specialized markings quilters need. As quilting expert Beth Cooper emphasizes, precision is paramount in quilting where even slight deviations can disrupt an entire design.
What to buy: Start with these two rulers:
- 6″ x 24″ ruler: This is your workhorse for cutting strips and yardage. It’s the single most-used ruler in quilting.
- 12.5″ x 12.5″ square ruler: Essential for squaring up blocks before assembly and cutting large squares.
These two rulers will handle 95% of beginner quilting tasks. You can add specialty rulers later as you tackle more complex patterns.
Recommended brands: Creative Grids rulers are beloved for their non-slip surface and clear markings. Omnigrid and Bloc Loc are also excellent choices. The key features to look for are clear markings, non-slip backing, and durable construction.
4. Sewing Machine
You’ll need a sewing machine to piece your quilt top (sew the fabric pieces together). The good news? You don’t need anything fancy.
Why it’s essential: While historical quilters hand-stitched everything, a sewing machine makes the process exponentially faster and allows you to create more complex designs. If your sewing machine can sew a straight line, you have everything you need for basic quilting.
What you need: A basic sewing machine with:
- Straight stitch capability
- Ability to adjust stitch length
- Reverse stitch function (for backstitching)
- Quarter-inch seam foot (more on this below)
You don’t need fancy decorative stitches, embroidery functions, or computerized features for piecing quilt tops.
Recommended approach: If you don’t own a sewing machine, consider borrowing one or buying a reliable used machine before investing in something expensive. Many quilters start with basic machines that cost $100-300 and produce beautiful quilts.
Popular beginner machines: Brother, Janome, and Singer all make excellent entry-level machines. Janome is particularly popular among quilters for reliability and ease of use.
5. Quarter-Inch Seam Foot
Standard quilting seams are 1/4 inch. A quarter-inch seam foot (also called a 1/4″ foot or quilting foot) is a presser foot with a guide that helps you maintain consistent 1/4″ seams.
Why it’s essential (well, almost): While technically you can quilt without this, maintaining consistent 1/4″ seams by eye or with masking tape is incredibly difficult and leads to inaccurate piecing. Inconsistent seams mean your blocks won’t fit together properly.
What to buy: Check if your machine came with a 1/4″ foot. Many sewing machines include one in the accessory box. If not, you can purchase one specifically for your machine model – they typically cost $10-30. Make sure to buy one compatible with your specific machine brand and model.
6. High-Quality Thread
Thread is what holds your entire quilt together, so quality matters more than you might think.
Why it’s essential: Cheap thread can break during sewing, create lint buildup in your machine, and may not hold up well over time. Good thread makes the sewing process smoother and ensures your quilt lasts for generations.
What to buy: For piecing (sewing the quilt top), use 50-weight cotton thread. This weight is perfect for quilting – strong enough to hold seams but thin enough not to create bulk.
Start with neutral colors: white, off-white, light grey, medium grey, and black or dark grey. These will work with the vast majority of fabric combinations. You can add more colors as needed.
Recommended brands: Aurifil is the gold standard – quilters swear by it for smooth sewing and durability. Gütermann and Coats & Clark are also excellent options at more accessible price points.
7. Fabric Scissors
Even with a rotary cutter, you’ll still need scissors for various tasks like trimming threads, cutting around templates, and other detail work.
What to buy: You need two types:
- Small embroidery scissors (4-5″): For snipping threads and detail work
- Full-size fabric shears (8-10″): For cutting fabric when a rotary cutter isn’t practical
Critical rule: Use your fabric scissors ONLY for fabric. Never cut paper, plastic, or anything else with them, or they’ll become dull. Consider labeling them “FABRIC ONLY” if others might use them.
Recommended brands: Gingher scissors are considered the best, though they’re pricey. Fiskars makes excellent scissors at a more accessible price point.
8. Seam Ripper
Here’s a truth every quilter knows: you will make mistakes. Even expert quilters use seam rippers constantly. A seam ripper allows you to quickly and precisely remove incorrect stitches without damaging the fabric.
Why it’s essential: Sewing the wrong pieces together, sewing pieces in the wrong orientation, or simply making a crooked seam all require you to remove stitches and try again. Without a seam ripper, this process is frustrating and can damage your fabric.
What to buy: Seam rippers are inexpensive ($3-8), and most sewing machines come with one included. Having multiple seam rippers is actually helpful – many quilters keep one at their sewing machine, one at their cutting station, and one in their travel kit.
9. Iron and Ironing Board
Pressing is absolutely essential in quilting. You’ll press seams after every step to ensure accuracy and professional-looking results.
Why it’s essential: Proper pressing sets seams, ensures fabric lies flat, and makes accurate piecing possible. Unpressed or poorly pressed seams lead to puckered blocks and quilts that don’t lie flat.
What you need: A basic iron that gets really hot and has a steam function. You don’t need expensive features – heat and steam are what matter. Your existing iron probably works fine.
Your ironing board should be fairly sturdy to handle the weight and size of quilt tops. If your current ironing board is wobbly or small, consider upgrading to a sturdier model.
Pro tip: Many quilters use a dry iron (no steam) and a spray bottle of water for more controlled pressing. This prevents water marks and gives you more control over moisture.
10. Straight Pins
Straight pins hold fabric layers together while you sew, ensuring accurate piecing and preventing shifting.
Why they’re essential: Pins keep your fabric pieces precisely aligned as they move through the sewing machine. Without pins, fabric can shift, leading to inaccurate seams.
What to buy: Fine, sharp pins with glass or plastic heads. Glass-headed pins won’t melt if you accidentally iron over them. Flat-headed pins are easier to grasp but don’t have this heat resistance.
How many: A box of 100-250 pins is a good starting point. Store them in a magnetic pin cushion or tray to prevent them from scattering.
Recommended types: Quilting pins are slightly longer than standard sewing pins and work well for holding multiple fabric layers. Flower head pins are popular because the flat heads are easy to see and grasp.
11. Fabric
Obviously, you need fabric to make a quilt! But choosing fabric can be overwhelming for beginners.
What to buy: Start with good-quality quilting cotton. This fabric has a medium weight and tight weave specifically designed for quilting. It’s stable, durable, easy to sew with, and holds up to washing.
How much: This depends entirely on your chosen pattern. Most beginner patterns specify exactly how much fabric you need. A common first project is a lap quilt (50″ x 60″), which might require 3-5 yards of various fabrics plus 3-4 yards for backing.
Where to buy: Local quilt shops offer expertise and can help you choose coordinating fabrics. Online retailers like Fat Quarter Shop, Missouri Star Quilt Company, and Connecting Threads offer huge selections. Big box craft stores (Joann, Hobby Lobby) carry quilting cotton at accessible prices, especially with coupons.
Color tip: For your first quilt, consider buying a pre-cut bundle (like a “jelly roll” of strips or “charm pack” of squares) or a complete quilt kit. These take the guesswork out of fabric selection and ensure everything coordinates beautifully.
12. Batting
Batting (also called wadding) is the middle layer of your quilt sandwich – it goes between the quilt top and backing to provide warmth, loft, and texture.
What to buy: For your first quilt, choose cotton or cotton-blend batting. It’s easy to work with, doesn’t shift or beard (poke through the fabric), and provides a traditional look.
Batting comes in different lofts (thicknesses). For beginners, low-to-medium loft is easiest to work with.
How much: Buy batting slightly larger than your finished quilt size – typically 4-6 inches larger on all sides. Pre-cut batting sizes are available for common quilt sizes, or you can buy batting by the yard and cut it yourself.
Recommended brands: Warm & Natural (cotton), Hobbs Heirloom (cotton or 80/20 cotton-poly blend), and Pellon (polyester) are all excellent beginner-friendly options.
Very Useful Tools: Not Essential, But Highly Recommended
These tools aren’t absolutely necessary to make a quilt, but they’ll make your life significantly easier and are worth adding to your collection early on.
Quilting Clips
These are an alternative to pins for holding fabric layers together, especially useful for thick layers or when pinning would leave visible holes.
When they’re useful: Binding, thick seams, holding quilt sandwich layers together
Recommended: Wonder Clips or similar spring-loaded quilting clips
Marking Tools
You’ll occasionally need to mark fabric for placement, quilting lines, or other purposes.
What to buy: Start with a fabric marking pencil or water-soluble marker. Always test on scrap fabric first to ensure marks will come out.
Recommended: Frixion pens (heat-erasable), Clover water-soluble markers, or mechanical chalk pencils
Basting Supplies
Basting holds your quilt sandwich (top, batting, backing) together before quilting. You’ll need either basting spray OR basting pins.
Option 1: Basting Spray – Fast, easy, gives excellent results. Cons: aerosol can, requires ventilation, ongoing expense
Option 2: Curved Safety Pins – Reusable, no fumes, cheaper long-term. Cons: time-consuming, can leave small holes
Many quilters prefer basting spray for speed and results, but pins are perfectly fine and more budget-friendly.
Extra Square Rulers
As you progress, you’ll want additional square rulers in sizes like 6.5″, 9.5″, and 15.5″ for different block sizes.
Seam Roller or Finger Presser
For pressing seams without using an iron, especially useful at your cutting station.
Nice to Have: Tools for Later
These tools are helpful once you’re committed to quilting, but don’t buy them right away.
Design Wall
A large piece of flannel or felt hung on a wall where you can arrange fabric pieces before sewing. Helpful for auditioning layouts.
Specialty Rulers
Half-square triangle rulers, flying geese rulers, hexagon rulers, and other specialty shapes. Only buy these when you need them for specific projects.
Walking Foot
A special presser foot for machine quilting that helps feed all layers evenly. You’ll want this when you’re ready to machine quilt your projects.
Thread Snips/Snippets
Spring-loaded thread cutters that are faster than scissors. Convenient but not necessary.
Tailor’s Clapper
A wooden pressing tool that helps achieve flat seams. Useful for advanced quilters working with lots of small pieces.
Quilting Gloves
Special grippy gloves that help maneuver quilts while machine quilting. Only needed if you plan to machine quilt large projects.
What to Avoid as a Beginner
1. Buying Complete “Beginner Kits”
Many kits include dozens of items you won’t use for months or years. It’s better to buy tools as you need them.
2. Cheap Tools That Will Frustrate You
While you don’t need top-of-the-line everything, certain tools (rotary cutters, rulers, scissors) are worth buying quality versions that will last. Cheap rotary cutters have safety locks that fail and screws that loosen.
3. Too Many Specialty Rulers
Start with the basic 6″ x 24″ and 12.5″ square. Add specialty rulers only when patterns specifically call for them.
4. Fabric That’s Too Cheap or Too Expensive
Fabric that’s $2/yard is usually poor quality and difficult to work with. But you also don’t need $20/yard designer fabric for your first quilt. Quality quilting cotton at $8-12/yard is the sweet spot.
5. Complicated First Projects
Don’t start with curved piecing, tiny pieces, or patterns with 500+ pieces. Begin with simple designs using larger pieces – you’ll build skills and confidence.
Building Your Quilting Space on a Budget
You don’t need a dedicated quilting room or thousands of dollars in equipment. Many successful quilters work from small apartments or shared spaces.
Minimum space requirements:
- Area for cutting (dining table works great)
- Space for sewing machine
- Access to an ironing board
- Storage for fabric and supplies
Budget-friendly tips:
- Use your dining table as a cutting surface
- Store your cutting mat under a bed
- Keep fabric in clear plastic bins
- Use a rolling cart for supplies (easy to tuck away)
- Press at your ironing board, cut at the table, sew at a desk – you don’t need everything in one space
How to Learn: Resources for Beginners
Free Resources:
- YouTube tutorials (Quilting with Angela Walters, Missouri Star Quilt Company, Jordan Fabrics)
- Free patterns from fabric manufacturers and quilting websites
- Online quilting communities (Reddit’s r/quilting, Facebook groups)
Paid Resources Worth Considering:
- Local quilt shop classes – hands-on instruction helps avoid bad habits
- Online courses (Craftsy, Bluprint) for specific techniques
- Quilting books for reference
Community Resources:
- Local quilting guilds welcome beginners and offer support
- Charity quilting groups provide purpose and community
- Quilting bees and sew days at quilt shops
Research published in the Journal of Women & Aging found that quilting groups provide valuable social connections, with older quilters likely to share skills with children and grandchildren. These relationships become increasingly important as we age.
Your First Project: Choosing Wisely
For your absolute first quilt, choose a pattern that:
- Uses large pieces (6″ squares or larger)
- Has a simple, repetitive block pattern
- Requires minimal cutting and piecing
- Doesn’t involve curves, set-in seams, or advanced techniques
Excellent beginner patterns:
- Simple nine-patch quilt
- Rail fence pattern
- Basic strip quilt
- Large square patchwork
- Disappearing nine-patch
Consider making a baby quilt (36″ x 45″) or lap quilt (50″ x 60″) rather than a full-size bed quilt. Smaller projects are less overwhelming and you’ll see results faster.
Caring for Your Tools
Good tool maintenance ensures they last for years:
Rotary Cutters:
- Change blades when they start skipping or pulling fabric
- Clean lint from the blade mechanism regularly
- Store with safety lock engaged
Cutting Mats:
- Clean with mild soap and water
- Never iron on them
- Store flat away from heat
Sewing Machine:
- Remove lint from bobbin area regularly
- Oil according to manufacturer instructions
- Professional servicing every 12-24 months
Scissors and Rulers:
- Clean residue from rulers with rubbing alcohol
- Store scissors in protective sheaths
- Never use fabric scissors on paper
Conclusion: You’re Ready to Begin
Learning to quilt is an investment in a skill that will bring you joy, creative fulfillment, and significant health benefits for years to come. The initial cost of tools might seem substantial, but remember: these tools will last for dozens or even hundreds of quilts.
Your essential starter checklist: ✓ 45mm rotary cutter ✓ 24″ x 36″ self-healing cutting mat ✓ 6″ x 24″ quilting ruler ✓ 12.5″ x 12.5″ square ruler ✓ Sewing machine with 1/4″ foot ✓ 50-weight cotton thread (neutrals) ✓ Fabric scissors (small and large) ✓ Seam ripper ✓ Iron and ironing board ✓ Straight pins ✓ Fabric, batting, and backing for your chosen project
With just these tools and a willingness to learn, you have everything you need to create your first beautiful quilt.
Remember the research: every stitch you take is benefiting your brain health, reducing your stress, potentially lowering your risk of cognitive decline, and connecting you with a rich tradition of makers. You’re not just learning to quilt – you’re investing in your overall wellbeing.
So gather your tools, choose a simple pattern, and make that first cut. Your quilting journey – and all the cognitive, emotional, and social benefits that come with it – starts now.
Happy quilting!
Scientific Sources and References
Burt, E. L., & Atkinson, J. (2012). The relationship between quilting and wellbeing. Journal of Public Health, 34(1), 54-59. https://academic.oup.com/jpubhealth/article