Learning crochet is much easier when you can see each step clearly. That is why beginner crochet tutorials with pictures are one of the best ways to start crocheting with confidence. Visual guidance helps beginners understand stitches, hand positions, and yarn movement without confusion or frustration.
In this complete guide, you will learn how to crochet step by step using beginner-friendly tutorials designed to work perfectly with pictures. From tools and basic stitches to simple practice projects, this article will help you build strong crochet skills from scratch.
Why Crochet Tutorials With Pictures Are Best for Beginners
Written instructions alone can feel overwhelming for new crocheters. Pictures make learning crochet faster and clearer.
Crochet tutorials with pictures help beginners:
- Understand stitch placement visually
- Learn hand and hook positioning
- Avoid common mistakes early
- Build confidence more quickly
- Follow tutorials without guessing
For visual learners, picture-based tutorials are often more effective than text alone.
Crochet Supplies Needed Before You Start
Before following crochet tutorials, gather the right tools.
Best Yarn for Beginner Crochet Tutorials
Choose yarn that makes stitches easy to see.
Recommended yarn:
- Medium weight yarn (Worsted weight / Size 4)
- Smooth texture
- Light or medium color
Cotton or acrylic yarn works well for beginners. Avoid dark, fuzzy, or novelty yarns.
Recommended Crochet Hook for Beginners
- Size H (5.0 mm) – best overall choice
- Size I (5.5 mm) – if you crochet tightly
Ergonomic hooks are helpful for longer practice sessions.
Extra Tools You Will Need
- Scissors
- Yarn needle
- Stitch markers (optional)
How to Hold a Crochet Hook and Yarn (With Pictures)
Before starting stitches, beginners should understand how to hold the hook and yarn.
Common Crochet Hook Holds
- Pencil grip
- Knife grip
Pictures showing both grips help beginners choose what feels most comfortable.
Yarn Tension Basics
Pictures showing yarn wrapped around fingers help beginners maintain even tension and prevent tight stitches.
Beginner Crochet Tutorial #1: Slip Knot (With Pictures)
The slip knot is the first step in crochet.
Steps:
- Create a loop with the yarn
- Pull a strand through the loop
- Tighten gently around the hook
Pictures help beginners understand loop direction and placement.
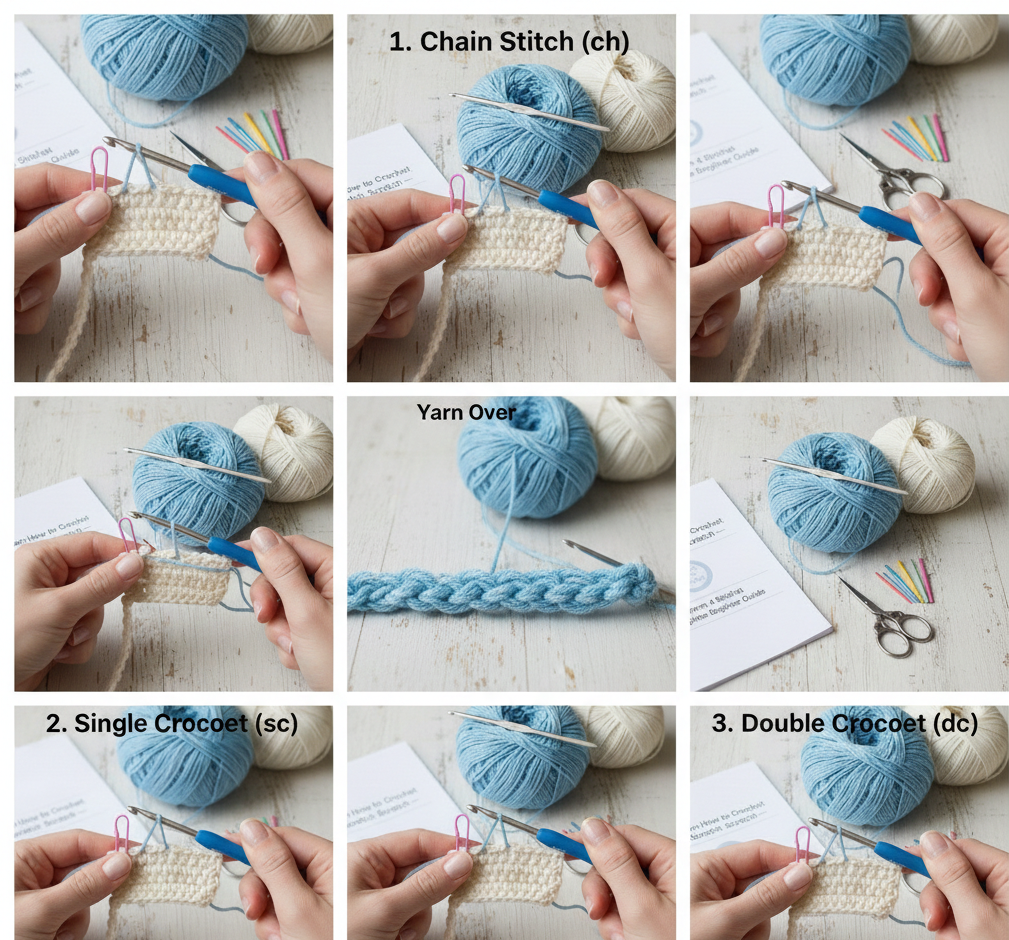
Beginner Crochet Tutorial #2: Chain Stitch (ch)
The chain stitch creates the foundation for crochet projects.
Steps:
- Yarn over
- Pull yarn through the loop on the hook
Pictures should clearly show:
- Yarn over motion
- Loop formation
- Even chain spacing
Beginner Tip:
Loose chains are easier to work into later.
Beginner Crochet Tutorial #3: Single Crochet (sc)
Single crochet is one of the most important beginner stitches.
Steps:
- Insert hook into the stitch
- Yarn over
- Pull through the stitch (2 loops on hook)
- Yarn over
- Pull through both loops
Pictures help beginners identify:
- Where to insert the hook
- The top “V” of each stitch
- Loop count on the hook
Beginner Crochet Tutorial #4: Half Double Crochet (hdc)
Half double crochet adds height while staying beginner-friendly.
Steps:
- Yarn over
- Insert hook into stitch
- Yarn over and pull through (3 loops on hook)
- Yarn over and pull through all loops
Pictures help clarify yarn overs and loop control.
Beginner Crochet Tutorial #5: Double Crochet (dc)
Double crochet is common in beginner patterns.
Steps:
- Yarn over
- Insert hook into stitch
- Yarn over and pull through
- Yarn over, pull through 2 loops
- Yarn over, pull through 2 loops
Pictures showing each pull-through step are especially helpful.
How to Turn Your Work (Beginner Tutorial)
Turning rows can confuse beginners.
Picture-based tutorials should show:
- Turning chain placement
- Where the next stitch goes
- Edge alignment
Turning chains help maintain consistent height.
Beginner Crochet Tutorial: How to Finish and Weave in Ends
Finishing a project neatly is important.
Steps:
- Cut yarn, leaving a tail
- Pull yarn through last loop
- Use yarn needle to weave ends
Pictures show:
- Needle placement
- Direction of weaving
- How to hide yarn securely
Easy Beginner Crochet Projects With Picture Tutorials
Once beginners understand basic stitches, small projects work best.
Best Beginner Crochet Projects
- Crochet coasters
- Crochet dishcloths
- Crochet mug rugs
- Crochet bookmarks
- Simple scarves
Picture tutorials help beginners visualize size, shape, and stitch placement.
Common Beginner Crochet Problems (With Visual Help)
Uneven Edges
Pictures help beginners recognize missed stitches.
Tight Stitches
Images showing relaxed tension make adjustments easier.
Skipping Stitches
Close-up images help beginners learn stitch anatomy.
How to Practice Crochet Using Picture Tutorials
- Practice one stitch at a time
- Compare your work to tutorial images
- Crochet slowly and intentionally
- Use light-colored yarn
Pictures provide reassurance that you are doing it correctly.
Crochet Tutorials With Pictures vs. Video Tutorials
Both formats are helpful.
Pictures are best for:
- Reviewing steps slowly
- Printing instructions
- Comparing stitch placement
Many beginners prefer combining picture tutorials with short videos.
Crochet as a Relaxing and Creative Skill
Crochet tutorials with pictures reduce stress and frustration. Seeing each step clearly helps beginners enjoy the process rather than feel overwhelmed.
Crochet encourages mindfulness, creativity, and patience.
Conclusion
Beginner crochet tutorials with pictures are one of the most effective ways to learn crochet from scratch. Visual guidance helps beginners understand stitches, avoid mistakes, and build confidence quickly.
With the right tools, clear picture tutorials, and simple practice projects, anyone can learn crochet successfully. Take your time, enjoy the learning process, and let each stitch guide you forward