
You’ve learned about quilting supplies, chosen your fabrics, and you’re ready to actually start making something. But where do you begin? The answer: with a single quilt block.
A quilt block is the fundamental building unit of any quilt. Think of it as a single square or rectangular piece that, when sewn together with other blocks, creates the beautiful quilt top you’ve been dreaming of. The amazing news? Most quilt blocks are surprisingly simple to make, using just basic shapes like squares and triangles arranged in clever ways.
In this comprehensive tutorial, we’ll walk you through making a classic beginner-friendly quilt block: the Four-Patch block. This simple design uses only squares – no triangles, no curves, no complicated techniques. Yet it’s the foundation for countless beautiful quilt designs. Once you master this basic block, you’ll understand the fundamental principles that apply to every quilt block you’ll ever make.
Whether you’re a complete quilting beginner or someone who’s been intimidated by the idea of making quilt blocks, this step-by-step guide will give you the confidence and skills to create your first perfect block today.
Why Start with a Four-Patch Block?
Before we dive into the tutorial, let’s talk about why the Four-Patch is the perfect starting point for beginners.
It’s Genuinely Simple:
- Uses only squares (no triangles to worry about!)
- Just four pieces sewn together
- Requires only straight seams
- No matching of points or complicated piecing
- Can be completed in 15-20 minutes
It Teaches Essential Skills:
- Accurate 1/4″ seam allowances (the foundation of all quilting)
- Pressing technique (crucial for flat, professional blocks)
- Nesting seams (making seams match perfectly)
- Squaring up blocks (ensuring accurate size)
It’s Incredibly Versatile:
- Creates beautiful quilts on its own
- Forms the basis for countless other quilt blocks
- Can be arranged dozens of different ways
- Works with any fabric combination
According to quilting experts, mastering the Four-Patch block gives beginners immediate success while building confidence for more complex patterns. In fact, many traditional quilt blocks (like Pinwheel, Double Nine-Patch, and Jacob’s Ladder) are just creative arrangements of Four-Patch blocks!
What You’ll Need
Materials
Fabric: For practicing your first block, you’ll need:
- 2 squares of light fabric: 3″ x 3″ each
- 2 squares of dark/contrast fabric: 3″ x 3″ each
These measurements create a 5″ finished block (5.5″ unfinished).
Best fabrics for learning:
- 100% quilting cotton (medium weight)
- Light to medium colors (easier to see stitches)
- High contrast between light and dark fabrics (shows pattern clearly)
Thread:
- All-purpose cotton or polyester thread in neutral color
- 50-weight thread
Tools
Essential:
- Sewing machine
- 1/4″ presser foot (or regular foot with needle adjusted)
- Rotary cutter (or fabric scissors)
- Cutting mat
- Quilting ruler
- Iron and ironing board
- Straight pins
- Seam ripper (for mistakes!)
Helpful but Optional:
- Seam gauge for checking measurements
- Square ruler for trimming blocks
- Fabric marking pen
Total Cost for Practice Block
- Fabric scraps: Free to $2
- Thread: $0.25 (small amount)
- Total: Under $2 to practice!
Understanding Quilt Block Terminology
Before we start sewing, let’s clarify some terms you’ll encounter:
Finished Size: The size of the block AFTER it’s sewn into a quilt (5″ in our example)
Unfinished Size: The size of the block BEFORE it’s sewn to other blocks (5.5″ in our example)
Why the difference? When you sew blocks together, you use 1/4″ seam allowances on all sides. This means the block shrinks by 1/2″ total (1/4″ on each side).
1/4″ Seam Allowance: The most critical measurement in quilting! This is the distance between the edge of your fabric and your stitching line. Consistent 1/4″ seams are the key to blocks that fit together perfectly.
Pressing vs. Ironing:
- Pressing: Lifting the iron and setting it down (what you do in quilting)
- Ironing: Sliding the iron across fabric (what you do on clothes)
Quilters press to avoid distorting fabric pieces.
Nesting Seams: When two seam allowances are pressed in opposite directions, they “nest” or lock together, helping seams align perfectly.
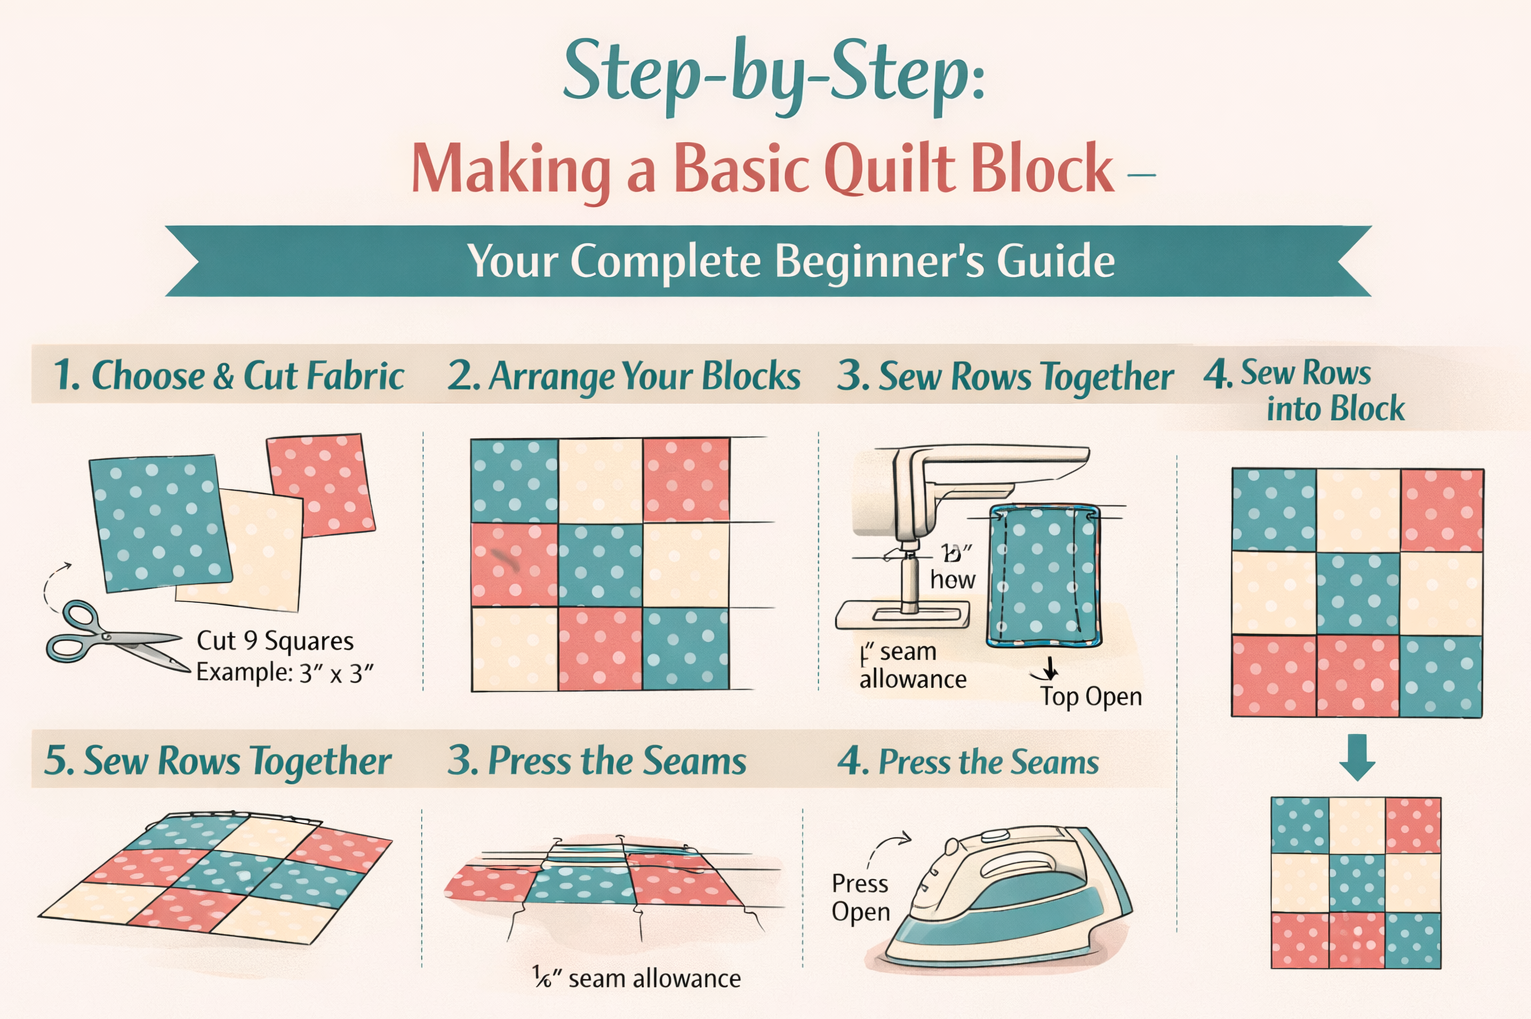
Step 1: Cut Your Fabric Squares
Accurate cutting is the foundation of successful quilting. Take your time here!
Instructions:
- Prepare your fabric:
- Press fabric to remove wrinkles
- Make sure edges are straight
- Cut four 3″ x 3″ squares:
- 2 from light fabric
- 2 from dark/contrast fabric
- Use rotary cutter and ruler for accuracy
- OR carefully cut with fabric scissors
- Check your accuracy:
- Measure each square to confirm it’s exactly 3″ x 3″
- Not 2.9″ or 3.1″ – exactly 3″
- This precision matters!
Why accuracy matters: If your squares aren’t exactly the same size, your finished block won’t be the correct size and won’t fit with other blocks properly.
Cutting tips:
- Place ruler firmly on fabric – don’t let it shift
- Cut next to the ruler in one smooth motion
- Use a sharp rotary cutter blade
- Always cut away from your body for safety
Step 2: Arrange Your Squares
Before sewing, lay out your squares to see how they’ll look.
Instructions:
- Create a checkerboard pattern:
![[ Light ] [ Dark ]
[ Dark ] [ Light ]](https://stitchpatternhub.com/wp-content/uploads/2026/02/Light-Dark-.png)
- Check your arrangement:
- Diagonal squares should be the same fabric
- Creates visual interest with alternating colors
- Take a photo (optional):
- Helps you remember the arrangement
- Easy reference while sewing
Design tip: The beauty of Four-Patch blocks comes from the contrast between fabrics. High contrast (light vs. dark) creates clear patterns. Low contrast (two similar colors) creates subtle effects.
Step 3: Sew the First Row
Now we’ll start sewing! We’ll make two rows of two squares each, then sew the rows together.
Instructions:
- Pick up Row 1 squares:
- Take the top left square (light)
- Place it on top of the top right square (dark)
- Right sides together (pretty sides touching)
- Align the edges:
- Make sure all edges match perfectly
- Pin if desired (optional for small pieces)
- Sew with 1/4″ seam allowance:
- Place under presser foot
- Align fabric edge with 1/4″ guide on your machine
- Sew from top to bottom
- Backstitch at beginning and end (3-4 stitches backward, then forward)
- Remove from machine and clip threads
- Check your seam:
- Should be a consistent 1/4″ from edge
- If not, adjust and try again
The 1/4″ Seam Test: If unsure about your 1/4″ seam:
- Cut three strips 1.5″ x 6″
- Sew them together with 1/4″ seams
- Press seams to one side
- Measure the width – should be exactly 3.5″
- If not, adjust needle position or presser foot placement
Step 4: Press the First Row
Pressing is NOT optional in quilting – it’s essential!
Instructions:
- Set the seam:
- Place sewn pieces on ironing board (still folded, as sewn)
- Press iron down on the seam line
- This “sets” the stitches into the fabric
- Open and press seam to one side:
- Open the two squares
- Press seam allowance toward the DARK fabric
- Use the side of your iron, not the tip
- Press from the right side (pretty side up)
Why press toward dark fabric?
- Seam allowances won’t shadow through light fabric
- Industry standard practice
- Creates less bulk behind light fabrics
Pressing tips:
- Use steam for best results
- Lift and press (don’t slide iron)
- Press until fabric is completely flat
- No puckers or pleats allowed!
Step 5: Sew the Second Row
Repeat the process for Row 2.
Instructions:
- Pick up Row 2 squares:
- Take bottom left square (dark)
- Place on top of bottom right square (light)
- Right sides together
- Sew with 1/4″ seam:
- Same process as Row 1
- Backstitch at beginning and end
- Press the seam:
- Set the seam
- Open and press toward DARK fabric (the bottom left square)
Critical note: Your Row 1 seam is pressed to the RIGHT (toward dark fabric). Your Row 2 seam is pressed to the LEFT (toward dark fabric). This creates opposite directions – which is exactly what we want!
Step 6: Sew the Rows Together
This is where the magic happens – your Four-Patch comes together!
Instructions:
- Position the rows:
- Place Row 1 on top of Row 2
- Right sides together
- The center seams should meet in the middle
- Nest the seams:
- Feel where the two center seams meet
- Because they’re pressed in opposite directions, they should “nest” or lock together
- This ensures perfect alignment!
- Pin the center:
- Place a pin through both seam allowances right at the seam line
- This holds them in perfect alignment
- Sew across:
- Sew with 1/4″ seam allowance
- Sew slowly when crossing the center seam
- You’ll feel a little bump as you sew over the seam allowances – that’s normal!
- Backstitch at beginning and end
- Remove pin before it reaches the needle:
- Never sew over pins (can break your needle!)
Step 7: Press the Final Seam
Almost done! Just one more pressing step.
Instructions:
Method 1: Press to One Side (Easier for Beginners)
- Press seam allowance to one side (either direction works)
- Make sure center seam allowances stay nested
- Press flat from the right side
Method 2: Press Open (Creates Flatter Block)
- Open the seam allowance
- Press both seam allowances away from center (opposite directions)
- Creates less bulk but requires more precision
For beginners: Use Method 1 (press to one side). It’s easier and the seam allowances help support each other.
Step 8: Square Up Your Block
This final step ensures your block is the correct size and perfectly square.
Instructions:
- Measure your block:
- Should measure 5.5″ x 5.5″ (unfinished size)
- Measure in multiple places
- Check that all sides are equal
- If block is too large:
- Place on cutting mat
- Use square ruler to trim evenly from all sides
- Keep center seams centered
- If block is too small:
- Check your seam allowances – probably wider than 1/4″
- Practice the 1/4″ seam test again
- For this block, you can still use it (just note the size)
Why squaring matters: When all your blocks are exactly the same size, they fit together perfectly in your quilt. Blocks that are slightly different sizes create problems during assembly.
Step 9: Admire Your Work!
Congratulations – you’ve made your first quilt block!
Look at what you accomplished:
- Accurate cutting
- Consistent 1/4″ seams
- Proper pressing technique
- Nested seams that match perfectly
- A block that’s the correct size
This block taught you every fundamental skill you need for quilting!
What to Do with Your Block
Option 1: Make More Blocks Practice makes perfect! Make 8 more blocks (9 total) and you can:
- Sew them into a baby quilt (add borders and backing)
- Create a pillow cover
- Make a table mat or wall hanging
Option 2: Try Different Arrangements Make blocks with different fabrics and arrange them in various ways:
- All the same (creates uniform pattern)
- Alternating colors (creates secondary patterns)
- Random/scrappy (modern look)
Option 3: Progress to Next Level Try these slightly more advanced blocks:
- Nine-Patch (9 squares instead of 4)
- Rail Fence (strips instead of squares)
- Half-Square Triangles (introducing triangles!)
Understanding Block Math
Now that you’ve made a basic block, let’s understand the math behind it.
Formula for any Four-Patch block:
- Decide finished block size (example: 8″)
- Divide by 2 (because it’s 2 squares across): 8 ÷ 2 = 4″
- Add 1/2″ for seam allowances: 4″ + 0.5″ = 4.5″
- Cut squares: 4.5″ x 4.5″
Practice:
- 6″ finished block → 3.5″ cut squares
- 8″ finished block → 4.5″ cut squares
- 10″ finished block → 5.5″ cut squares
- 12″ finished block → 6.5″ cut squares
This formula works for ANY size Four-Patch block!
Common Problems and Solutions
Problem: Center seams don’t match Cause: Seam allowances aren’t consistent or blocks weren’t pinned properly Solution: Practice 1/4″ seam test, pin center seams carefully, press seams in opposite directions
Problem: Block is too small Cause: Seam allowances are wider than 1/4″ Solution: Adjust needle position closer to edge, or use 1/4″ presser foot
Problem: Block is too large Cause: Seam allowances are narrower than 1/4″ Solution: Adjust needle position away from edge slightly
Problem: Block is wavy or puckered Cause: Not pressed properly or fabric stretched during sewing Solution: Press more carefully, use steam, don’t pull fabric while sewing
Problem: Fabric edges don’t align when sewing Cause: Cutting wasn’t accurate Solution: Take more time with cutting, use rotary cutter and ruler
Problem: One square is twisted or off-grain Cause: Fabric wasn’t straight before cutting Solution: Always press fabric and straighten edges before cutting
Variations on the Four-Patch
Once you’re comfortable with the basic Four-Patch, try these variations:
Scrappy Four-Patch:
- Use four different fabrics
- Creates fun, random look
- Great for using up scraps
Double Four-Patch:
- Make four Four-Patch blocks
- Sew them together to create larger block
- Creates checkerboard effect
Four-Patch with Border:
- Add strips around outside of Four-Patch
- Creates framed effect
- Good practice for borders
Sixteen-Patch:
- Instead of 2×2 arrangement, make 4×4
- Uses same technique, just more squares
- Creates more intricate pattern
Next Steps: Beyond the Four-Patch
Now that you’ve mastered the Four-Patch, you’re ready for:
Level 1 (You Are Here): Four-Patch block Level 2: Nine-Patch block (3×3 squares) Level 3: Rail Fence (strips) Level 4: Half-Square Triangles (introduces triangles) Level 5: Pinwheel (uses HSTs in Four-Patch arrangement) Level 6: Star blocks (combines squares and HSTs)
Each level builds on skills from the previous level!
Making Your First Quilt with Four-Patch Blocks
Ready to turn blocks into a quilt? Here’s a simple plan:
Baby Quilt (9 blocks):
- Make 9 Four-Patch blocks (8″ finished size)
- Arrange in 3 rows of 3 blocks
- Sew blocks into rows
- Sew rows together
- Add simple border
- Layer with batting and backing
- Quilt and bind
Result: Beautiful 30″ x 30″ baby quilt!
Lap Quilt (20 blocks):
- Make 20 Four-Patch blocks (10″ finished size)
- Arrange in 4 rows of 5 blocks
- Assemble as above
Result: Cozy 50″ x 40″ lap quilt!
Time Investment
First block: 30-45 minutes (taking it slow, learning) Second block: 20-30 minutes (more comfortable) Third block: 15-20 minutes (getting confident!) After 10 blocks: 10-15 minutes (you’re an expert!)
Many experienced quilters can make a Four-Patch block in under 10 minutes, including cutting!
Why This Block Matters
The Four-Patch might seem simple, but it’s teaching you skills that apply to EVERY quilt block:
✓ Accurate 1/4″ seams ✓ Proper pressing technique
✓ Nesting seams for perfect points ✓ Squaring up blocks ✓ Understanding finished vs. unfinished sizes ✓ Block math and sizing
These fundamentals apply whether you’re making a simple Four-Patch or a complex Mariner’s Compass!
Conclusion: You’re a Quilter Now!
Congratulations on making your first quilt block! This simple Four-Patch taught you the foundational skills that every quilter uses, whether they’re making their first block or their thousandth.
The beautiful thing about quilting is that even the most complex blocks are just combinations of simple shapes sewn together with care. You now understand:
- How to cut accurately
- How to sew a perfect 1/4″ seam
- How to press for flat, professional results
- How to make seams nest and match
- How to square up your work
These skills transfer to every quilt block and every quilt you’ll ever make.
So what are you waiting for? Make another block! And another! Each one will be faster and easier than the last. Before you know it, you’ll be making complete quilts and wondering why you were ever intimidated by the process.
Your quilting journey has officially begun. Welcome to the wonderful world of quilting!
Happy quilting!
Sources and References
- The Seasoned Homemaker. (2024). Easy Quilt Block Tutorials for Beginners. https://www.seasonedhomemaker.com/